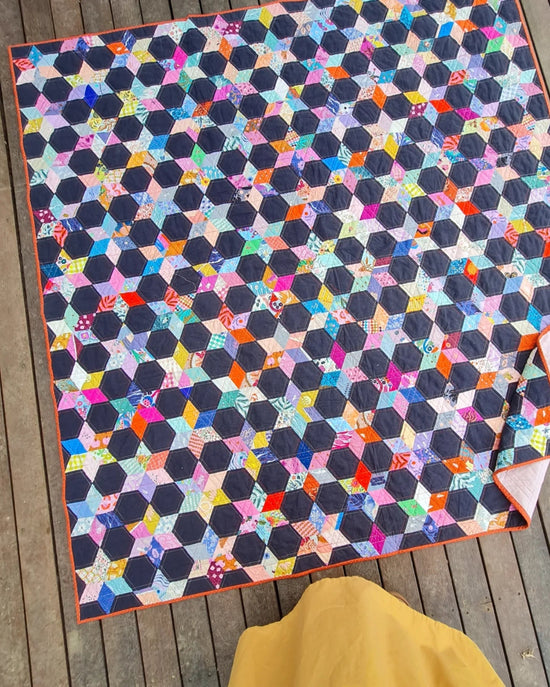
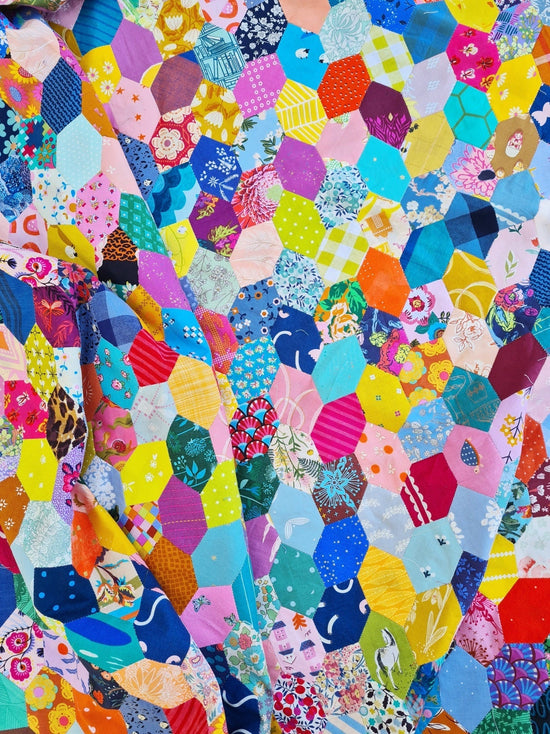
Waterwheel Quilt - A Free EPP Quilt Pattern

I made this quilt many years ago after seeing a gold and white version of the pattern while looking into Islamic Design. If you haven't come across Islamic Design much, have a look on Pinterest or Google. the patterns, mostly stars, are so beautiful, and the perfect inspiration for EPP.
In Waterwheel, I love how the completely coloured hexagons look they have pretty kites coming from the points to make subtle stars, and I love the movement of the ‘cogs’ created by the white shapes.
Waterwheel is a simple, sparkly quilt that's the perfect size and skill level for a beginner or the ideal quick finish for a seasoned stitcher. It's happily joining my collection of free English paper pieced (EPP) patterns!
(If you need some help to get started with EPP, I've created a collection of beginner friendly tutorials to get you started here.)
Finished Quilt Size: 37" x 43"

Supplies
ENGLISH PAPER PIECES (download below)
(294) 1 ½" Kites
(106) 3” Equilateral Triangles
FABRIC
Colored 1 ½" Kites:
- (12) 3 ½" WOF strips OR (204) 3" x 3 ½" scraps
Background Fabric:
For 1 ½" Kites: (5) 3 ½" WOF strips OR (90) 3" x 3 ½" scraps
For 3" Equilateral Triangles: (6) 3 ¼" WOF strips OR (106) 3 ½" square scraps
Binding: ⅓ yard
Backing: 1 ½ yards
ADDITIONAL SUPPLIES
- 48" x 58" batting
- Rotary cutter/mat/ruler
- Embroidery scissors
- Hand-sewing needles (Bohin Milliners, size 9)
- 50-weight thread (Aurifil)
- Craft glue stick and/or Clover Wonder Clips for basting (see basting tutorial here)
- Sewing machine
- Iron
CUTTING INSTRUCTIONS
Colored 1 ½" Kites:
- Fabric scraps: Cut the scraps 3/8" larger on all sides for all paper templates.
- Yardage: Orient the kites on the 3 ½" strip oriented with the points perpendicular to the strip in alternating orientations. Cut between the paper templates ensuring a 3/8" seam allowance for each shape. Cut (204) colored kites from the fabric strips.

Background Fabric:
- For 1 ½" Kites: Using the same directions as above, but using the background fabric, cut (90) background kites.
- For 3" Equilateral Triangles: Orient the triangles on the 3 ¼" strip in alternating orientations. Cut between the paper templates ensuring a 3/8" seam allowance for each shape. Cut (106) equilateral triangles from the background fabric strips.
Binding:
- Cut (4) 2 ½" WOF strips.
STITCHING THE COLORED HEXAGON BLOCKS
1. Prepare all the pieces for the quilt by basting the fabric to the paper templates.
2. Stitch 2 kites together along the long side, from the outside edge to the narrow point.
3. Without breaking the thread, add another kite and sew from the point to the outside edge. Repeat.
4. Sew the 2 halves of the block together to complete the block. Make (18) coloured hexagons.

STITCHING THE mixed HEXAGON BLOCKS
5. Lay out two halves of a mixed block. One half will have one background kite between two coloured kites, and the other half will have one coloured kite between two background kites, as shown in the diagram.
6. Repeat steps 2-4 to make (28) mixed hexagons.

STITCHING THE mixed HALF BLOCKS
7. Lay out half of a mixed block featuring one background kite between two coloured kites, as shown in the diagram.
8. Repeat steps 2-3 to make (6) mixed half blocks.

STITCHING THE COLUMNS
9. This quilt is made from two differently laid out columns, Column A and Column B.
10. To make Column A, lay out 7 blocks as follows: a coloured hexagon, a mixed hexagon with a colored kite oriented towards the top, and a mixed hexagon with a coloured kite oriented towards the bottom. Repeat. Complete the column with a coloured hexagon. See left diagram for reference.
11. To make Column B, lay out 6 whole blocks and 2 half blocks as follows: a half block with the point oriented down, a mixed hexagon with a coloured kite oriented down, a coloured hexagon, a mixed hexagon with a coloured kite oriented towards the top, a mixed hexagon with a coloured kite oriented down, a coloured hexagon, a mixed hexagon with a coloured kite oriented towards the top, and a half block oriented with the point upwards. See right diagram for reference.

12. Stitch two 3" equilateral triangles to the top of each whole hexagon block.
13. Stitch two 3" equilateral triangles to the top of the 3 half blocks at the bottom of each Column B.
14. Stitch two 3" equilateral triangles to the bottom of the last whole hexagon in each Column A.

15. Stitch the blocks into completed columns as shown in the diagram. Make (4) of Column A and (3) of Column B.

ASSEMBLING THE QUILT TOP
16. Lay the rows out A-B-A-B-A-B-A, checking for pleasing colour placement. Take a photo on your phone for reference or label the rows 1-7.
17. Join the rows together as shown in the diagram.

18. Continue adding the rows one at a time, and remove the papers, if desired, once a row is completely surrounded. Doing so as you go makes the quilt a bit lighter to handle for sewing subsequent rows, but you can wait until the quilt is completed before removing papers, if desired.
19. Once the quilt is complete, remove any remaining papers, and press the quilt top flat.

FINISHING
20. Open out the seam allowance of the outside edge pieces and press open and away from the quilt top.
21. Layer the backing (wrong side up), batting, and quilt top (right side up). Baste the layers together. Quilt as desired. The featured quilt was hand quilted, following the edges of the background areas.
22. Trim the quilt top, batting, and backing to ¼" away from where the papers have been around the perimeter of the quilt as shown in the diagram. This step will trim the triangles at the top and bottom of the quilt top

23. Sew the binding strips together end to end using diagonal seams. Press the binding in half wrong sides together.
24. Leaving an 8" tail of binding, sew the binding to the quilt through all layers, matching all raw edges. Miter corners. Stop approximately 12" from where you started. Lay both loose ends of binding flat along quilt edge. Where these two loose ends meet, fold them back on themselves and press to form a crease. Using this crease as your stitching line, sew the two open ends of the binding together right sides together. Trim seam to 1/4" and press open. Finish sewing binding to quilt.
25. Turn the binding to the back of quilt and stitch in place.
Ready to make this free EPP quilt pattern?
Click the button below to have the FREE printable paper templates and colouring sheet delivered right to your inbox!


Do you have kits for the waterwheel quilt, papers and templates, if so what cost please, I love the look of this, look forward to hearing from you, 😊 thanks
I was so moved by the experiences you shared. I can relate. I keep reminding myself that consistency matters much more than perfection. Congratulations on hanging in there! And thank you for so generously sharing.
Jodie – Thank you for this lovely pattern and for the story accompanying the notice in your newsletter. As a quilter and the mother of another young man enamoured with MTB, I found it so honest and so touching. Best of luck to both you and Tully.
Чудесное одеяло! Именно то, что я хотела! Спасибо за Вашу щедрость!
Leave a comment