

Boston Ivy Quilt - A Free EPP Quilt Pattern

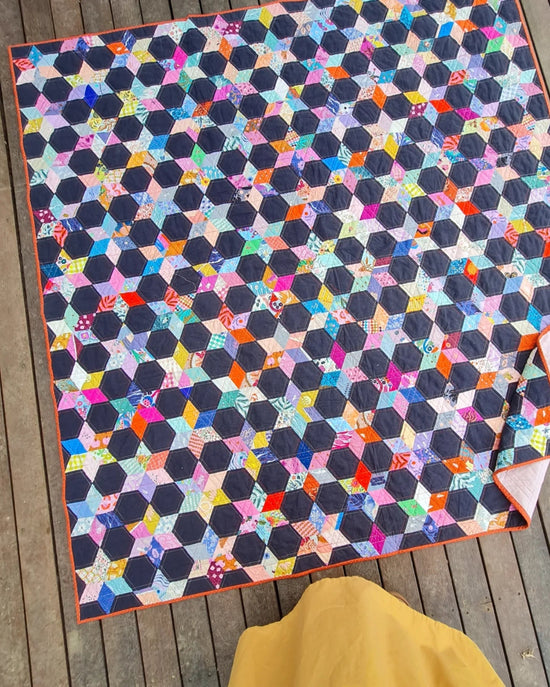
Boston Ivy is a beautiful quilt of patchwork vines I made by reusing all of the honeycomb pieces from my Lucy's Terrace Quilt. It also used up any pieces I basted for that quilt but decided didn't fit. I love how unwanted shapes get lost in a quilt like this and the whole quilt still looks beautiful. It's what makes scrappy quilts my absolute favourite to make! So, I'm beyond thrilled to be able to add Boston Ivy to my lineup of free EPP patterns.
(If you need some help to get started with EPP, I've created a collection of beginner friendly tutorials to get you started here.)
Finished Quilt Size: 52" x 55"

Supplies
ENGLISH PAPER PIECES (PURCHASE OR DOWNLOAD BELOW)
- (784) honeycombs/ (1) Lucy's Terrace EPP Kit
FABRIC REQUIREMENTS
- Honeycombs: 4 ¾ yds OR (20) fat quarters OR (784) 2 ½" x 3 ½" scraps
- Backing: 3 ½ yards
- Binding: ½" yard
Additional Supplies
- 60" x 63" batting
- Rotary cutter/mat/ruler
- Embroidery scissors
- Hand-sewing needles (Bohin Milliners, size 9)
- 50-weight thread (Aurifil)
- Craft glue stick and/or Clover Wonder Clips for basting (see basting tutorial here)
- Sewing machine
- Iron

Cutting Instructions
Fabric scraps:
- Cut the scraps 3/8" larger on all sides around the paper piece templates.
Yardage:
- For honeycombs: Cut (66) 2 ½" width of fabric (WOF) strips OR (131) 2 ½" width of fat quarter (WOFQ) strips. Sub cut (784) 2 ½" x 3 ½" rectangles, OR using the honeycomb paper pieces as a guide, trim around the honeycombs leaving a 3/8" seam allowance on all sides.
Binding: Cut (6) 2 ½" width of fabric (WOF) strips.
Stitching the Vines: Two Methods
While making this quilt is actually rather easy, explaining it is much trickier! As such, I've given two methods for creating the vines here so you can choose which one suits you best. Note that the construction of the quilt once the vines have been completed is the same with either method. You will be instructed to jump to the “Stitching the Quilt Top” section at the end of each method.
Method 1
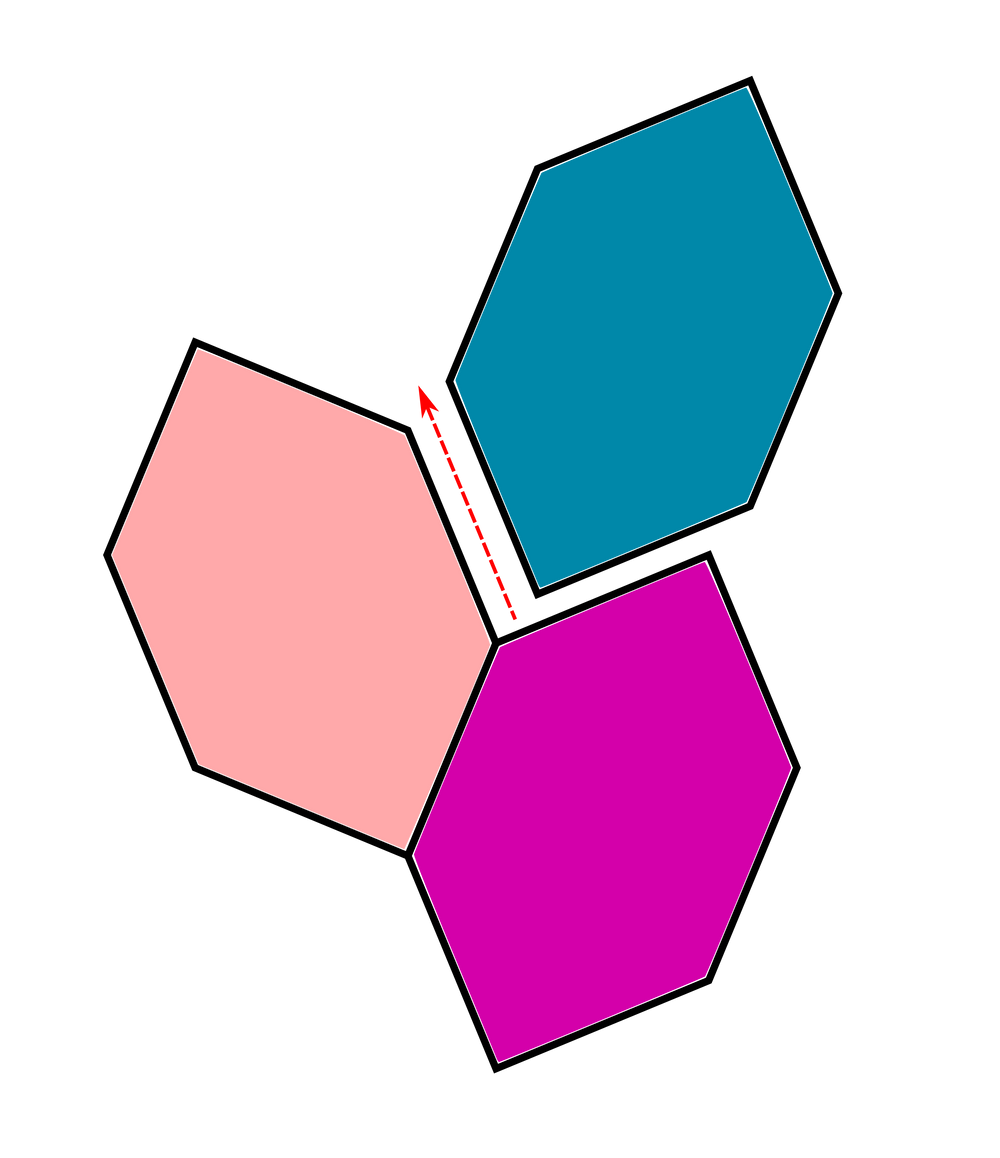
1. Begin by tipping your bottom honeycomb (dark pink in the diagram) slightly right. Then stitch a honeycomb (peach in the diagram), tipped slightly left, to its side, as shown in the diagram.

2. Without snipping the thread, add the next honeycomb (blue) to the vine by tipping it slightly right and stitching it to the second honeycomb (peach) in the vine, as shown in the diagram. (Don't worry about stitching it to the dark pink one yet.)
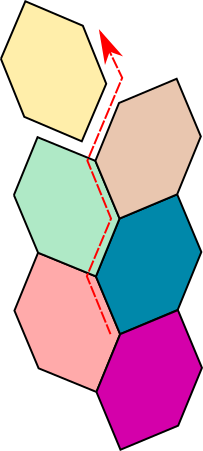
3. Continue adding honeycombs in one continuous seam (as shown in the diagram) until you have a vine with 49 honeycombs.
4. Go back and stitch the seams between the honeycombs.
Go to “Stitching the Quilt Top” section to continue.
Note! I found Method 1 great for choosing fabrics that went next to each other and spreading out prints, but I quickly realised that while I was spreading out colours evenly, I didn't actually have an even amount of colours basted. I had more blue, yellow, and pink scraps than any other colour, so I could see that I was going to run out of the other colours first and be left with lots of the same colour for the last vines.
After a few vines, I decided to go back to my trusted scrappy method of spreading out prints and colours. Follow along with me for this process in Method 2 below.
Method 2
1. Baste all of your fabric to your paper shapes.
2. Take 2 honeycombs and tip them slightly right. Sew them together along adjacent seams as shown in the digram.
3. Make 192 pairs facing this same direction.
4. Sew the pairs into 16 rows of 24 honeycombs each. (Set these aside for step 8.)

5. Next, take note of the change in direction! Take 2 honeycombs and tip them slightly left. Sew them together along adjacent seams as shown in the digram.
6. Make 192 pairs facing this same direction. (You should have 16 honeycombs leftover. Set these aside for step 8.)
7. Sew the pairs into 16 rows of 24 honeycombs each. Set aside.

8. Take the remaining 16 honeycombs (from step 6), and add one honeycomb to each row that has the honeycombs facing slightly right, from step 4. These rows will be slightly longer than the rows facing left.
9. Take a ‘left’ row and a ‘right’ row and sew them to each other to make a vine. Again, the right row will be slightly longer at the top and bottom of each vine.
Continue to “Stitching the Quilt Top” section.

Stitching the Quilt Top
Sew your vines to each other, one at a time. To make the quilt top easier to handle, once you finish joining two rows, remove the papers from pieces that are completely surrounded.

Finishing
1. Remove any remaining papers and press your quilt top. Press all of your inside seams back in place, and press all of your outside seams out flat.
2. Layer the backing (wrong side up), batting, and quilt top (right side up). Baste the layers together. Quilt as desired. The featured quilt was machine quilted with straight stitching lines across the quilt, using the zig-zag seams as a guide and sewing slightly to the left of each seam.
3. Trim your quilt top, batting, and backing ¼" from where the papers have been. This quilt can be tricky to know where to trim! You need to choose the shapes furthest from the edge of the quilt. See the diagram on the right to see where to trim on each side of the quilt.

4. Sew the binding strips together end to end using diagonal seams. Press the binding in half wrong sides together.
5. Leaving an 8" tail of binding, sew the binding to the quilt through all layers, matching all raw edges. Miter corners. Stop approximately 12" from where you started. Lay both loose ends of binding flat along quilt edge. Where these two loose ends meet, fold them back on themselves and press to form a crease. Using this crease as your stitching line, sew the two open ends of the binding together right sides together. Trim seam to ¼ " and press open. Finish sewing the binding to quilt.
6. Turn the binding to the back of quilt and stitch in place.

Ready to make this free EPP quilt pattern?
Click below to have the FREE printable Boston Ivy colouring sheet and printable paper pieces delivered right to your inbox!
Save yourself 6 hours of cutting and 55 sheets of paper. Buy the shapes pre-cut below!
Note: Boston Ivy is made using the honeycomb shapes from the Lucy's Terrace paper pieces set. So you can make two quilts from one set of paper pieces. Yes, please!


I just wanted to send you a quick note to thank you for the free patterns. I am looking forward to doing some EPP.
Hi. I love the idea of this quilt and have so many scraps that could be put to good use. I’m fairly new to EPP but have been patchwork /quilting for some. Can i ask why you use 3/8th inch as the measurement you add to honeycombs when cutting them out rather than the usual 1/4 inch mostly used in patchwork?
Many thanks Erika
Leave a comment