

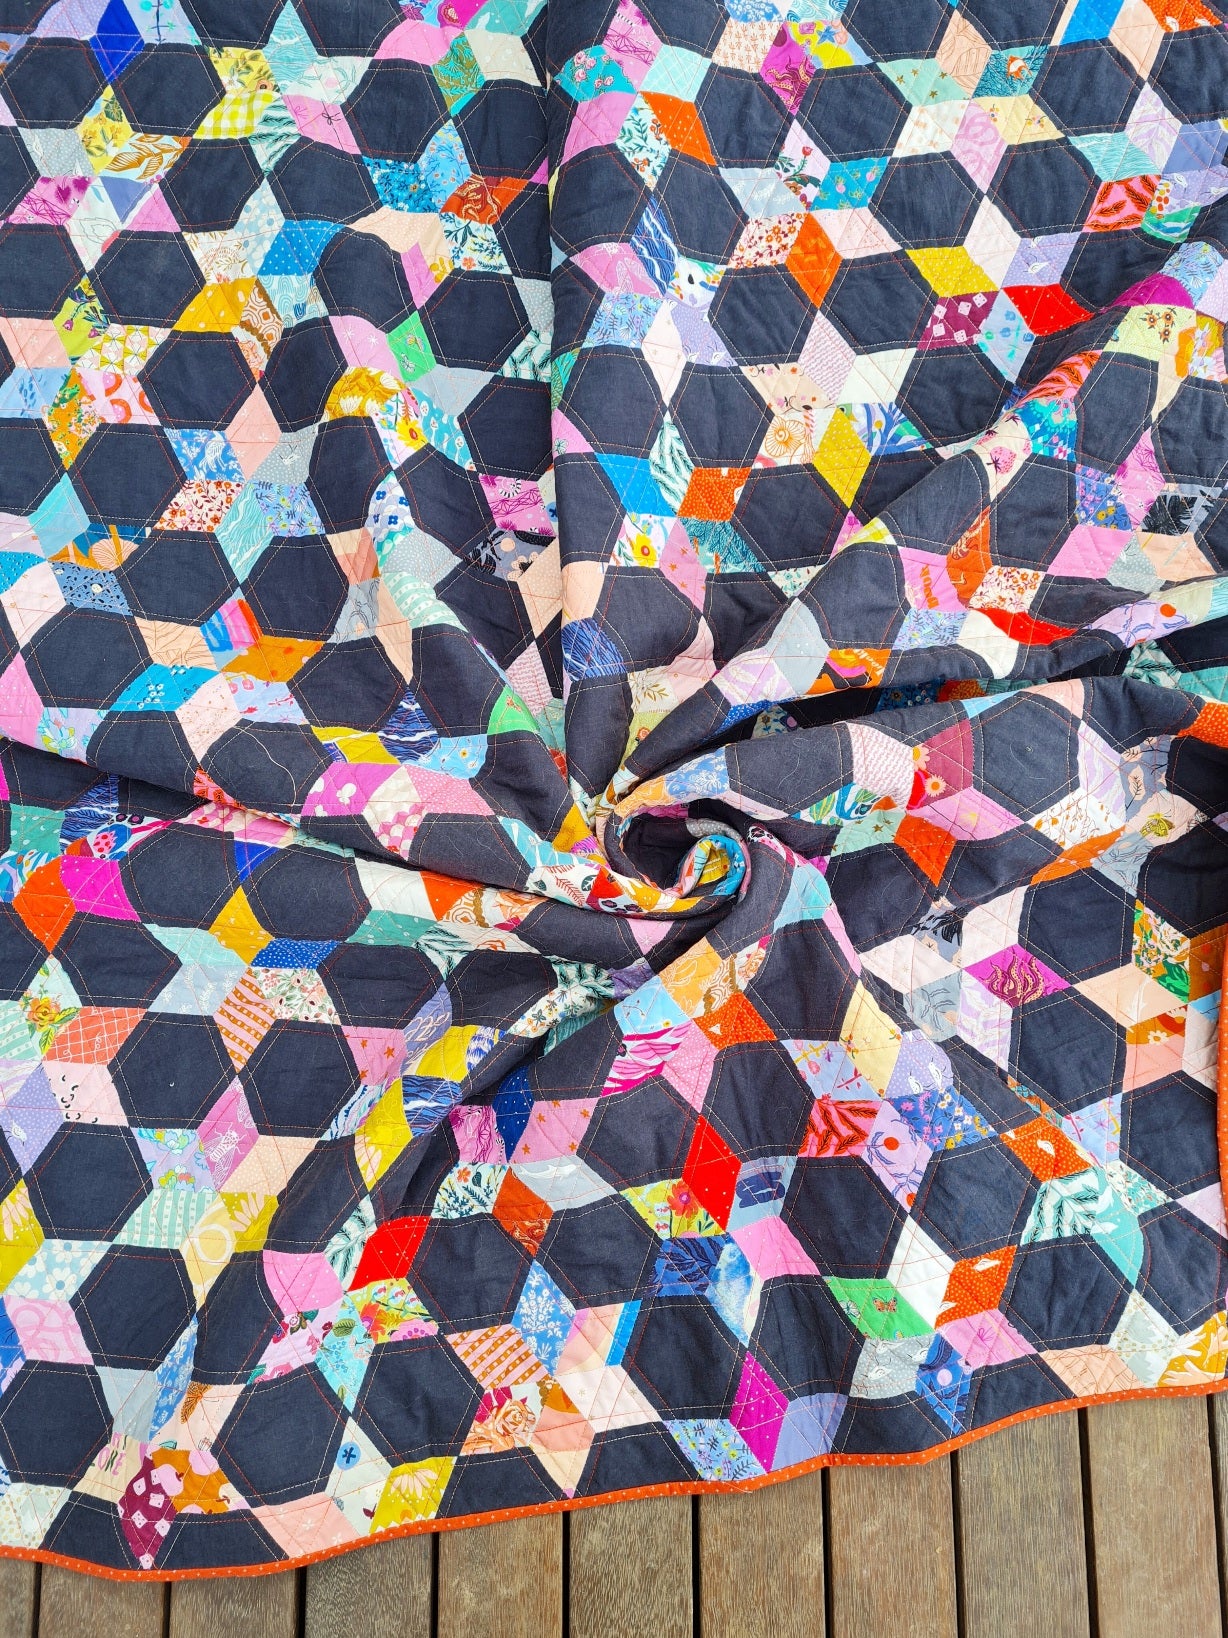
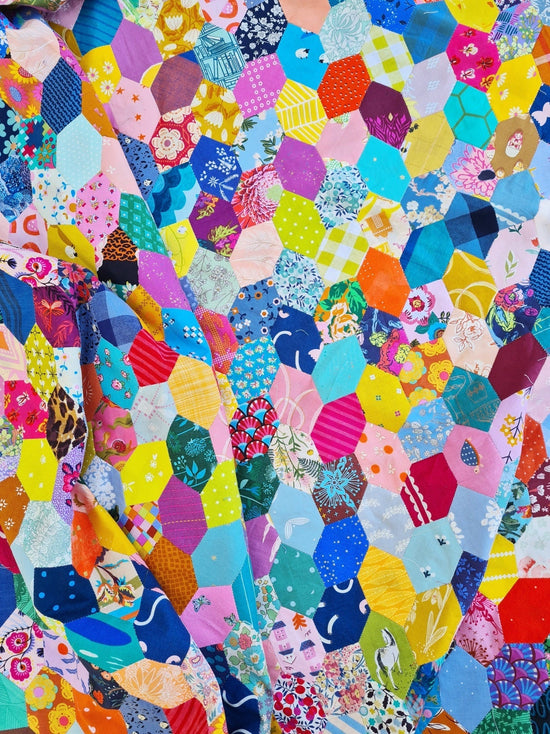
Midnight Feast Quilt - A Free EPP Quilt Pattern
This quilt didn't have a name for a long time. I actually keep a note in my phone just for quilt names when I get ideas! But none of them were a good fit for this beauty. A friend suggested "Midnight Sky," and I settled on that one for a while, until one evening, when my 9 year old had a friend here for a sleepover, and asked if they could have a "midnight feast."
A midnight feast is basically one of the most exciting things a 9 year old can think of for a sleepover. Staying up past bedtime, quilt laid out of the floor to catch crumbs, a late night picnic with the door closed that she doesn't have to share with her siblings. I mean, can you think of anything more exciting?!
And so, “Midnight Feast” became the perfect name for this quilt, made from a feast of scraps, often sewn late into the night as I'm always greedy for more quiet, uninterrupted hours. I hope you enjoy this quilt with the same treat-like anticipation, so it's joining my collection of free English paper pieced (EPP) patterns!
(If you need some help to get started with EPP, I've created a collection of beginner friendly tutorials to get you started here.)
Finished Quilt Size: 66" x 69"

Supplies
ENGLISH PAPER PIECES (PURCHASE OR DOWNLOAD BELOW)
- (680) 2" 6 point diamonds/ (1) Big Box of 2" Diamonds
- (232) 2" hexagons/ (1) Big Box of 2" Hexagons
FABRIC REQUIREMENTS
- Scrappy stars: 3 ½ yds OR (14) fat quarters OR (660) 2 ½" x 3 ½" scraps
- Background: 3 ¾ yds OR (15) fat quarters OR (232) 4 ½" squares for 2" hexagons AND (20) 2 ½" x 3 ½" scraps for 2" diamonds
- Binding: ⅔ yards*
- Backing: 4 ½ yards (I used a single bed flannelette sheet for this one and it fit beautifully.)
*You could officially get away with ½ yard, but barely. I recommend a bit more fabric in case of any cutting errors!
ADDITIONAL SUPPLIES
- 74" x 77" batting
- Rotary cutter/mat/ruler
- Embroidery scissors
- Hand-sewing needles (Bohin Milliners, size 9)
- 50-weight thread (Aurifil)
- Craft glue stick and/or Clover Wonder Clips for basting (see basting tutorial here)
- Sewing machine
- Iron
CUTTING INSTRUCTIONS
Fabric scraps:
- Cut the scraps 3/8" larger on all sides around the paper piece templates.
Yardage:
- For scrappy diamonds: Cut (48) 2 ½" width of fabric (WOF) strips OR (95) 2 ½" width of fat quarter (WOFQ) strips. Using the diamond paper pieces as a guide, cut (660) diamonds, leaving a 3/8" seam allowance on all sides.
- For background hexagons: Cut (29) 4 ½" WOF strips OR (58) 4 ½" WOFQ strips. Using the hexagon paper pieces as a guide, cut (232) background hexagons, leaving a 3/8" seam allowance on all sides.
- For background diamonds (for the left and right edges): Cut (2) 2 ½" WOF strips OR (3) 2 ½" WOFQ strips. Using the diamond paper pieces as a guide, cut (20) background diamonds, leaving a 3/8" seam allowance on all sides.
Binding: Cut (7) 2 ½" width of fabric (WOF) strips.
Stitching the Blocks
1. Prepare all of your shapes by basting the fabric to the paper.
2. Place two scrappy diamonds right-sides together and whipstitch along one seam. Open out the pair, and add a third diamond to make a half star.
3. Make 220 half stars.

Tip! In some quilts you might decide to baste and stitch as you go, working on one block at a time, but with this quilt, I basted all the shapes first. Then, I sewed all the half stars, and then I sewed them into full stars. This leads to a greater spread of your scrappy diamonds throughout the quilt.
4. Match up two half stars right-sides together at the point. Use a Clover clip to keep it in place. Sew along the straight seam to make a full star.
Tip! I always prioritise the points matching over the ends lining up. Sometimes the folds in the fabric will add an extra millimetre and make them seem off. These bits are always easily hidden when you sew the next part to the block.

5. Make 105 stars. This will leave you 10 half stars leftover.
6. Sew 2 background hexagons above each star.
Note! I used hexagons for the whole quilt and trimmed the ones that hung over the edge at the end. Doing it this way meant I didn't have to think about which stars would go at the top and which would require half hexagons.

Stitching the Quilt Top
7. Sew a star with hexagons attached under another star. Keep adding blocks until you have 10 in a row. Add another 2 hexagons to the end of the row. That's row A - the left row in the diagram.
8. Next up is row B. Take two of the half stars and sew 2 hexagons above one of the halves.
Sew blocks together as you did with the first row until you have 9 in a row. Sew the half block with hexagons at the end of the row with a star. Sew the half block without hexagons to the hexagons at the other end of the row. This is row B - the right row in the diagram.
9. Make (6) of row A and (5) of row B.

Note! I didn't lay out my blocks and plan the final layout before sewing them into rows. I did that next.
10. Lay out your rows A-B-A-B-A-B-A-B-A-B-A. Take a photo on your phone so you can remember what order you want to sew them together.
11. You can sew the rows together into pairs first, or just add one at a time to the quilt top. Either way, take surrounded papers out as you go to make the quilt top much easier to manage.

12. Finally, sew the background diamonds beside each star on the left and right of the quilt.
13. Once the quilt top is complete, remove any remaining papers and press the quilt top flat. Press all the internal seams back in place.
Tip! Hold your quilt top up in front of a window to easily see any hidden papers left in the quilt top!
14. Open out the seam allowance of the outside edge pieces and press in place.

FINISHING
15. Layer the backing (wrong side up), batting, and quilt top (right side up). Baste the layers together. Quilt as desired. The featured quilt was machine quilted with straight lines across the quilt, using the hexagons as a guide, ¼” on each side of the hexagon seams.

16. Trim the excess quilt top, batting, and backing ¼" beyond the seam line where the papers were.
17. Sew the binding strips together end to end using diagonal seams. Press the binding in half wrong sides together.
18. Leaving an 8" tail of binding, sew the binding to the quilt through all layers, matching all raw edges. Miter corners. Stop approximately 12" from where you started. Lay both loose ends of binding flat along quilt edge. Where these two loose ends meet, fold them back on themselves and press to form a crease. Using this crease as your stitching line, sew the two open ends of the binding together right sides together. Trim seam to ¼ " and press open. Finish sewing the binding to quilt.
19. Turn the binding to the back of quilt and stitch in place.

Ready to make this free EPP quilt pattern?
Click below to have the FREE printable Midnight Feast colouring sheet and printable paper pieces delivered right to your inbox!
Save yourself 10 hours of cutting and buy the shapes pre-cut below!


Hi Sharon,
Thanks so much for your comment on the Tales of Cloth blog! When you click on the link above, it takes you to a page where you enter your email address and it will send the free printable templates directly to your inbox. Just be sure to check the spam folder in case it gets lost in there. If you have additional issues getting the printable templates, feel free to email us at hello@talesofcloth.com, and we’ll see what we can do to sort it out. And, as a reminder, the pattern is available for free on our website, and not as a printable PDF pattern. Only the shapes and coloring page are available for printing. Don’t forget to print them at 100% to ensure accuracy!
I hope that helps clarify, and happy stitching!
Please send free pattern I clicked on. Thanks
The pattern I didn’t know I needed until I found it. I’ve been making 2” 6point stars for the last few months & not sure what to use .. that is until I saw this one. Love the clear instructions & im already half way through.. bonus. 3 very long hospital admissions in the last 12 months & with each one I have seen together a different quilt. The nurses & drs just love seeing the shapes come together to make a quilt by the end of my admission. With the next admission coming up in 18 days this is the perfect design for all my stars. The best bit is that this quilt is for me!! Thank you
Hi Barbie,
Thank you so much for your comment on the Tales of Cloth blog! We’re sorry you’ve been having trouble with receiving the Midnight Feast printables. I did a little digging to investigate why that might be happening, and I discovered that it is because you already received them previously. Unfortunately, our email service will not resend you an email that you’ve previously received. However, I’m very happy to resend the printable templates and coloring sheet for your convenience if you would email us at hello@talesofcloth.com. Happy stitching!
Thank you, this will help me get to grips with my stash.😀
Leave a comment