

Diamond Mine Quilt - A Free EPP Quilt Pattern


I made this quilt early in my English Paper Piecing (EPP) adventures. My main memory of making this quilt is actually held in the photo above. Clingy toddler, probably teething, with her soft polar-fleece coat on her little body that would fit in my lap. It looks happy and intimate, but really I far preferred to sew with my lap to myself! It was, however, the kind of experience that completely sold me on EPP. On clingy days like this, I never got any time on my machine, or doing anything I wanted! At least with EPP, I could sit in the lounge room, on the floor or the couch, and, toddler close by, could still keep my hands busy and my heart settled.
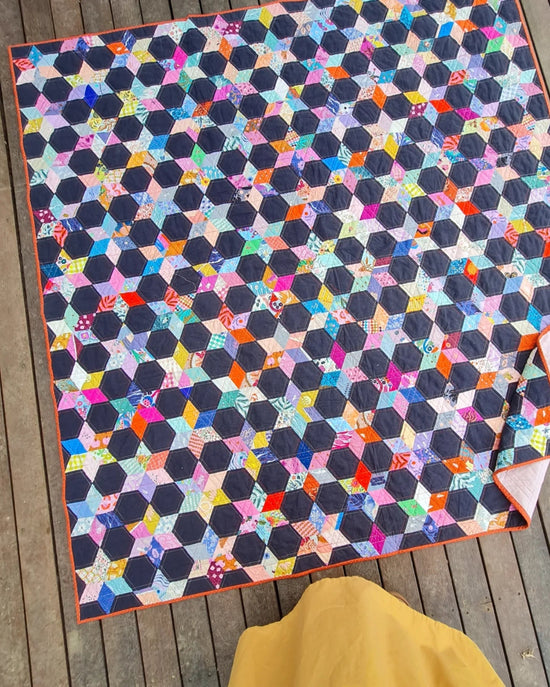
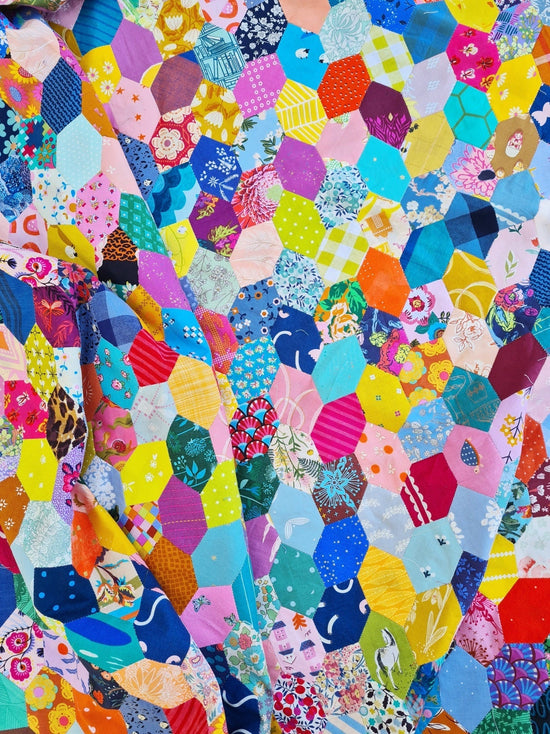
Diamond Mine is a free, easy EPP quilt pattern, perfect for beginners. It plays with the unique “crown” shape, made from ⅓ of a hexagon, and nests little diamonds within the design.
(If you need some help to get started with EPP, I've created a collection of beginner friendly tutorials to get you started here.)
Finished Quilt Size: 40" x 48"

Supplies
ENGLISH PAPER PIECES (download below)
- (204) 3" crowns
- (104) 1 1/2" 6-point (60 degree) diamonds
- (24) 1 1/2" kites (can be made by cutting crowns in half)
- (20) 1 1/2" equilateral triangles (can be made by cutting diamonds in half)
FABRIC
- (204) fabric scraps at least 3 1/4" x 5" OR (11) fat quarters OR (11) ¼ yard for crowns
- (24) fabric scraps at least 2 3/4" x 3 1/4" OR (1) fat quarter OR (1) ¼ yard for kites
- 1/2 yard solid for diamonds and triangles (featured in coral here)
- 1/2 yard for binding
- 2 2/3 yards for backing
ADDITIONAL SUPPLIES
- 48" x 56" batting
- Rotary cutter/mat/ruler
- Embroidery scissors
- Hand-sewing needles (Bohin Milliners, size 9)
- 50-weight thread (Aurifil)
- Craft glue stick and/or Clover Wonder Clips for basting (see basting tutorial here)
- Sewing machine
- Iron
GOING BIGGER?
If you want to make this quilt larger, keep an even number of rows, with an odd number of shapes in each row. It will make the top and bottom, and each side of the quilt symmetrical.

CUTTING INSTRUCTIONS
Fabric scraps:
- Cut the scraps 3/8" larger on all sides for all paper templates.
Yardage:
- For diamonds and triangles: Cut (7) 2" width of fabric (WOF) strips. Using the diamond and triangle paper templates as a guide, cut (104) diamonds and (20) triangles, leaving a 3/8" seam allowance on all sides.
- For crowns and kites: Cut (28) 3 ½" WOF strips. Using the crowns and kites as a guide, cut (204) crowns and (24), leaving a 3/8" seam allowance on all sides.
STITCHING INSTRUCTIONS
1. Prepare all the pieces for the quilt by basting the fabric to the paper templates. In this version, the solid colour fabric is used for all the diamonds and triangles, and the assorted scraps are used for all the crowns and kites.

2. Lay out the quilt in rows to create a pleasing arrangement of colours/fabrics. The featured quilt has 12 rows of 17 crowns each, with a kite at the beginning and end of each row. There are solid colour diamonds in the spaces between the crowns, and triangles at the top and bottom to finish off the edges.
3. Once you have a pleasing arrangement, number the rows for easier assembly. It's easy to mark on the paper template the row number and location, or simply stack the pieces from each row in order for stitching.
4. Row 1 begins with a kite, with the point oriented towards the top left corner of the quilt. Beginning at the point, stitch it to a crown (pointing down). Keep the thread attached to the pieces after securing the seam so you can sew continuously to add the next piece. Open out the pieces.

5. Add the next crown, pointing up and continue joining the pieces. After you have joined 17 crowns, finish the row by adding a kite, pointing to the top right of the quilt.


6. To fill in the gaps in the top of the row, add 10 solid triangles.

7. To fill in the gaps between the crowns, add 9 solid diamonds.

8. Continue stitching all the rows, adding kites at the row ends. Fill in the crown gaps with diamonds after stitching each row.
Note that the even and odd number rows mirror each other, and differ in the number of diamonds needed.
For row 12, don't add diamonds, add triangles to fill in the gaps at the bottom edge.

ASSEMBLING THE QUILT TOP
9. Join the rows in numerical order. Place row 2 over row 1, right sides together. Using 3 stitches for anchoring the threads and small whipstitches for joining the fabric folds, sew the edges of the pieces together, bending the papers as needed to match the edges and corners.

10. Add the rows one at a time, and remove the papers, if desired, once a row is completely surrounded. Doing so as you go makes the quilt a bit lighter to handle for sewing subsequent rows, but you can wait until the quilt is completed before removing papers if desired.

11. Once the quilt is complete, remove any remaining papers and press the quilt top flat.
FINISHING
12. Open out the seam allowance of the outside edge pieces and press again.
13. Layer the backing (wrong side up), batting, and quilt top (right side up). Baste the layers together. Quilt as desired. The featured quilt was hand quilted with perle cotton using vertical lines between the diamond points and outlining around the diamonds.
14. Trim the excess quilt top, batting, and backing 1/4” beyond the seam line where the papers have been.
15. Sew the binding strips together end to end using diagonal seams. Press the binding in half wrong sides together.
16. Leaving an 8" tail of binding, sew the binding to the quilt through all layers, matching all raw edges. Miter corners. Stop approximately 12" from where you started. Lay both loose ends of binding flat along quilt edge. Where these two loose ends meet, fold them back on themselves and press to form a crease. Using this crease as your stitching line, sew the two open ends of the binding together right sides together. Trim seam to 1/4" and press open. Finish sewing binding to quilt.
17. Turn the binding to the back of quilt and stitch in place.

Ready to make this free EPP quilt pattern?
Click the button below to have the FREE printable paper templates and colouring sheet delivered right to your inbox!
Save yourself hours of cutting and 38 sheets of paper. Buy the shapes pre-cut below!
Note: Diamond Mine can be made using the 3" crowns and 1 ½" 6 pt diamonds from the LARGE Ice Cream Soda quilt paper pieces set. So you can make two quilts from one set of paper pieces. Yes, please!


Hi Jo,
Thanks so much for your comment on the Tales of Cloth blog! Unfortunately, we don’t offer printable versions of the free patterns since they are available on the blog. We are glad you are enjoying them though! xx
I’m fairly new to EPP. Thank you for providing free templates and pattern. Is there a printable version of the pattern?
I have done some epp quilting but lost my grandmother’s flower garden quilt top 3/4 complete during one of our moves. My daughter suggested that I start doing epp quilting again as it is very portable and I can work on it in our camper and our small red house (300 sq ft) that we are moving into this weekend. The projects that I have seen on your blog are great for my retirement projects.
Thanks for your pattern & instructions .Even though I have been doing epp for quite a while , I still learnt some valuable pointers & techniques.
Thank you for the free pattern and templates! I’m just getting into EPP and I love it!!❤️
Leave a comment