

Flock of Stars Quilt - A Free EPP Quilt Pattern

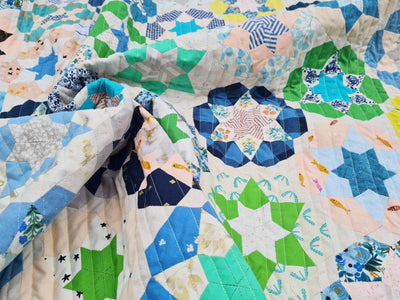
Quilt designs featuring 6-point stars tiled together are as old as the hills, or at least, the Romans! And, traditional patterns have always been my favourite. There's something so solid and beautiful and comforting about them. I made my first version below with an old friend of mine from university while her family visited ours. I had just started selling paper pieces in my shop and was making baby-sized quilts as samples. My friend Jenny, who had never sewn before, dove in to help me, and we spent the week drinking coffee, stitching, and catching up on several years apart. It was an incredibly precious time. At the end of our week together, I gifted her the quilt we had made together.

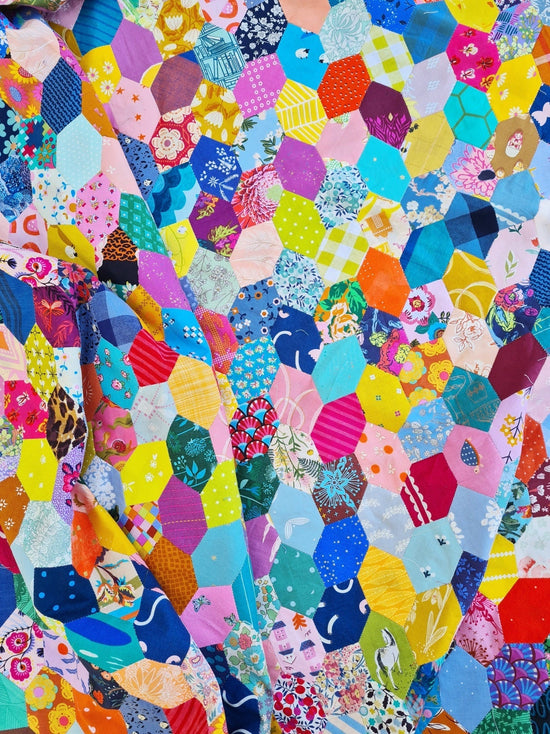
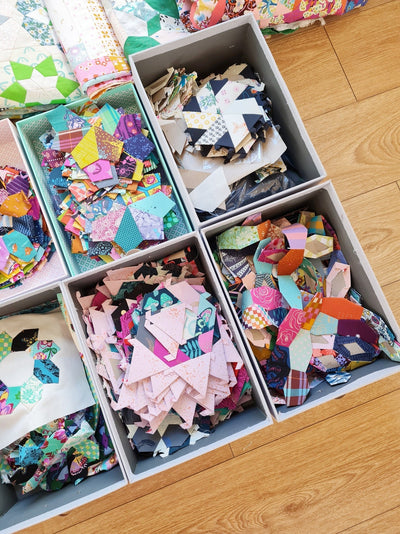
I made my second version for this pattern after we first moved to the town where we now live. Flock of Stars is the perfect moving house quilt. With all the diamonds cut and basted from my scrap baskets, there were no fabric choices to make or blocks to prepare. Instead, I slowly made my way through my pile of diamonds, sewing them all into half stars, and then into complete stars, and then adding the joining diamonds. It's my favourite way to sew when life is chaos. Progress is steady and easy, and the making is mindless.
Flock of Stars is an easy quilt made by many generations of quilters, finishing at a lovely lap size. It's happily joining my collection of free English paper pieced (EPP) patterns!
(If you need some help to get started with EPP, I've created a collection of beginner friendly tutorials to get you started here.)
Finished Quilt Size: 54" x 59"

Supplies
ENGLISH PAPER PIECES (PURCHASE OR download below)
(931) 2" 6 pt Diamonds/ (1) Big Box of 2" 6 pt Diamonds
(20) 2" equilateral triangles (I made these by cutting 10 diamonds in half.)
FABRIC
Coloured Stars:
- (44) 2 ½" WOF strips OR (604) 2 ½" x 3 ½" scraps
- (1) 2 ½" WOF strip OR (20) 2 ½" x 3" scraps
Background Fabric/Low volume diamonds:
1 ¾ yds of fabric OR (23) 2 ½" WOF strips OR (321) 2 ½" x 3 ½" scraps
Binding: ½ yard
Backing: 3 ½ yards
ADDITIONAL SUPPLIES
- 62" x 67" batting
- Rotary cutter/mat/ruler
- Embroidery scissors
- Hand-sewing needles (Bohin Milliners, size 9)
- 50-weight thread (Aurifil)
- Craft glue stick and/or Clover Wonder Clips for basting (see basting tutorial here)
- Sewing machine
- Iron

CUTTING INSTRUCTIONS
Coloured Stars:
- Fabric scraps: Cut the scraps 3/8" larger on all sides for all paper templates.
- Yardage: Place the paper pieces on the 2 ½" strips, and cut between the paper templates ensuring a 3/8" seam allowance for each shape. Cut (604) coloured diamonds and (20) coloured triangles from the fabric strips.
Background Fabric:
- Fabric scraps: Cut the scraps 3/8" larger on all sides for all paper templates.
- Yardage: Place the paper pieces on the 2 ½" strips, and cut between the paper templates ensuring a 3/8" seam allowance for each shape. Cut (321) background diamonds from the fabric strips.
Binding:
- Cut (6) 2 ½" WOF strips.

STITCHING THE STAR BLOCKS
1. Prepare all the pieces for the quilt by basting the fabric to the paper templates.
2. Stitch 2 diamonds together along one side, from the wide angle down to the narrow point.
3. Without breaking the thread, add another diamond, and sew from the narrow point to the wide angle.

4. Repeat steps 2-3 to make a second half star.
5. Sew the two halves together to make a star. Make (94) stars.

6. Stitch (3) 2" background diamonds to each star along the top and right crevices of each star as shown in the diagram. Set aside.

STITCHING THE Side blocks
7. Create a half star side block by stitching two coloured 2" diamonds together into a pair. Repeat to create another pair. Stitch the pairs together to create the half star shown in the diagram below. Make (10) half stars.
Note! Split the 10 half stars into piles of (5) half stars each. Decide which half stars will be on the left side and which will be on the right side before proceeding to the next step.
8. To make the left edge half star blocks, stitch two 2" background diamonds to the top right and right crevices of the half star as shown in the figure on the left of the diagram. Repeat for all (5) left edge half star blocks.
9. To make the right edge half star blocks, stitch one 2" background diamond to the top left crevice of the half star as shown in the figure on the right of the diagram. Repeat for all (5) right edge half star blocks.

STITCHING THE BOTTOM EDGE blocks
10. To make the bottom edge blocks, stitch two 2" background diamonds to the top two sides of a 2" equilateral triangle, as shown in the diagram. Repeat for all (8) bottom edge blocks. Set aside.

11. To make the bottom corner blocks, stitch a 2" background diamond to the left side of a 2" equilateral triangle, as shown in the diagram.
12. Repeat, but stitch the 2" background diamond to the right side of the 2" equilateral triangle, as shown in the diagram. Set aside.


STITCHING THE ROWS
13. This quilt is made from two differently laid out rows, Row A and Row B. To make Row A, lay out 9 whole blocks. Stitch the blocks together along adjacent seams. Make (6) of Row A.
14. To make Row B, lay it out beginning with a left edge half star block from step 8, followed by 8 whole blocks, and ending with a right edge half star from step 9. Make (5) of Row B.

ASSEMBLING THE QUILT TOP
15. Lay out the rows A-B-A-B-A-B-A-B-A-B-A, checking for pleasing colour placement. Take a photo on your phone for reference or label the rows accordingly.
16. Join the rows one at a time to create the quilt top, remove the papers, if desired, once a row is completely surrounded. Doing so as you go makes the quilt a bit lighter to handle for sewing subsequent rows, but you can wait until the quilt is completed before removing papers, if desired.
17. Sew 2" coloured triangles into the crevices at the top of the quilt top as shown in the diagram.
18. Sew 2" background diamonds into the crevices on the left edge of each Row A, as shown in the diagram.
19. Stitch the bottom edge blocks into the crevices along the bottom of the quilt top, as shown in the diagram.
20. Once the quilt is complete, remove any remaining papers, and press the quilt top flat.

FINISHING
21. Open out the seam allowance of the outside edge pieces and press open and away from the quilt top.
22. Layer the backing (wrong side up), batting, and quilt top (right side up). Baste the layers together. Quilt as desired. The featured quilt was machine quilted with straight lines using the background diamonds as a guide.
23. Trim the quilt top, batting, and backing to ¼" away from where the papers have been around the perimeter of the quilt as shown in the diagram. This step will trim the diamonds on the left and right edges of the quilt top.

24. Sew the binding strips together end to end using diagonal seams. Press the binding in half wrong sides together.
25. Leaving an 8" tail of binding, sew the binding to the quilt through all layers, matching all raw edges. Miter corners. Stop approximately 12" from where you started. Lay both loose ends of binding flat along quilt edge. Where these two loose ends meet, fold them back on themselves and press to form a crease. Using this crease as your stitching line, sew the two open ends of the binding together right sides together. Trim seam to 1/4" and press open. Finish sewing binding to quilt.
26. Turn the binding to the back of quilt and stitch in place.

Ready to make this free EPP quilt pattern?
Click the button below to have the FREE printable paper templates and colouring sheet delivered right to your inbox!
Save yourself hours of cutting and 58 sheets of paper by buying the shapes pre-cut below!


I just inherited some fabric from my mother-in-law and I think this would be perfect for them. Lots of small flowers and gingham. Thank you for sharing this wonderful pattern.
Beautiful quilt! Colors are fun. Maybe 🤔 someday?
Love the freedom of scrappy quilts and especially stars!!!! Great inspiration as i need a gentle project to keep my hands busy whilst trying to calm my mind!!! EPP does the trick for me. Thankyou for the inspiration and haring this lovely pattern😍
thank you for the reminder about the wonder of scrappy quilts – the one thing in life you don’t have to make decisions about. I really needed this. Feel better already. Eva
Only yesterday I relocated photos your original Flock of Stars Quilt (love the one wth the hot air balloon in it). It has a timeless quality. Very tempted to jump in and start one with time away from home fast approaching (daughter’s sport). It looks like a great option to stitch while being a spectator….
Leave a comment