

My Top 10 Tips for EPP Beginners
When I first tried English Paper Piecing (aka EPP), I viewed it as the kind of thing every quilter should try once. Like foundation paper piecing and Cathedral Windows and the scrappy trip around the world quilt. EPP was just on the list of things to try. I found a template online and used it to cut cereal boxes. Then I started cutting and thread basting my shapes…

Not a Good First Impression
And, I didn't really like it. I enjoyed the sewing, but I always needed to baste first, and once I'd used up all my papers, I needed to cut more templates, too! There just seemed to be too many steps to getting a quilt, and I wasn't sure it was worth the effort.
A couple of years later, however, my sewing machine went away for a routine service and didn't come back for 5 months! And so, in order to keep making, and to try to make the best of it, I turned back to EPP.
I chose a big, old quilt in one of my favourite antique quilts books, and decided if I was going to make something that big, I needed to do some planning. I bought papers and glue sticks to try out pre-cut papers and glue basting. I made a plan for the fabrics and set them aside. And very soon, I realised that EPP actually suited me perfectly.
If my machine had never gone in for that fateful service, I would have spent the rest of my life assuming EPP wasn't for me. But, it taught me that if I just dabble in something to give it a go, I won't really invest time into thinking about why it doesn't work for me. That's why my first advice for EPP is always to tune in, figure out what you like and what you don't like, and play with different ways to make it work for you. But, if you'd like to see what worked for me before you take on your own trial and error, read on for my top 10 tips for EPP beginners!

1. Use Pre-cut Papers
The biggest game-changer for me was pre-cut papers. Partly because I'd been using cereal cardboard which is WAY too thick, and partly because I just wanted to start sewing! I started with just a few small packs of shapes, and quickly ran out. And, even now, I save shapes and reuse them, but there's nothing like a complete paper piece pack to avoid any unnecessary hurdles caused by running out of paper templates. It paves a smooth road of stitching ahead of you.
You can find my pre-cut papers by quilt here. And, if you'd prefer to cut your own papers, read more on choosing the right paper here.

2. Plan Your Sewing Time
Before I took up EPP as a way of life, I would sit down to do it and then decide it was too hard or I wasn't in the mood. But, when my machine went AWOL, I decided to take time to prep my sewing time. For my machine sewing, I would already set aside time in natural daylight for choosing colours and cutting so that I could use evening time for sewing. I took the same approach for EPP. I spent a Saturday afternoon choosing colours for my next blocks and cutting them out. Then I could baste and stitch at any time through the week. If I spent time prepping, then anytime I felt like stitching, I could dive right in.
Spend a little time thinking about when you just want to fall into the couch and stitch (or head to that boring meeting armed with basted shapes to sew!), then work backwards and set aside time to organise your fabric and basting so that you can enjoy it when you need to.
If you're working with blocks, batch prepare several at a time so they last a week or two. Learn more about how I organise my time (among other things) here.

3. Stash up on Basics
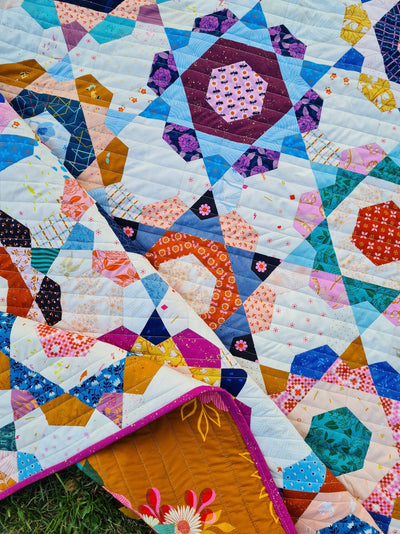
My first Ice Cream Soda quilt was the first scrappy EPP quilt that I made that sewed the blocks together in rounds (starting at the centre and working out). I made lots of blocks that, after sewing them together, I was a little disappointed by how they turned out. Every time that happened, I would stop and ask myself how I could improve. I realised that my fabric suited much bigger pieces, or more random, scrappy placement. Since then, I've been careful to buy ‘basics’, prints that mostly read as one colour, and have a little pattern on them for interest. Using basics helps my little shapes look neat and distinct, which is often the look I'm after.
You can find more info on how I buy my fabric here.

4. Experiment with Quick Cutting
Some people love to use acrylic templates to cut everything all neat and perfect. I'm not one of those people! My most common method of cutting fabric for EPP is cutting strips first, and then cutting my shapes from the strips. But sometimes you'll also find me digging through my scrap baskets and just using scissors to cut an approximate 3/8" seam allowance around the paper. Using either of these methods is an easy and fast way to cut in bulk ready for basting.
Of note, I do it this way because I mostly use basics in my EPP and don't really fussy cut. If you're fussy cutting, using acrylic templates to cut your fabric is the perfect choice!
Find my fussy cutting tutorial here, and my strip cutting tutorial here!

5. Glue Baste
This is just my own personal recommendation, and you'll see from my blog post here that not everyone agrees with me! But, if you've tried EPP before with thread basting and decided EPP wasn't for you, try glue! Using regular, small craft glue sticks made basting one of my favourite parts of the process, rather than the annoying bit I had to get through so I could actually start. Now, I set up at my dining table, or on my lap table with a good movie or audio book, and I can baste for hours!
I tend to this bit and the cutting bit in bulk so that I'm ready to sew whenever I want. Get my best glue basting tips here!

6. My Favourite Needle and Thread for EPP
I use Bohin Milliners needles in size 9. Milliners are a long, skinny needle with a small eye for the thread. I like the size 9 because the eye is big enough for Aurifil 50wt cotton thread, which is my favourite thread. If you prefer something finer, using a Bottomline polyester thread might suit you.
Finding the right needle and thread combo for you helps avoid pain in your hands from strain. You want the needle and thread to glide right through that fabric fold!
Check out all my recommeded tools for EPP here!

7. Easy and Organised Storage
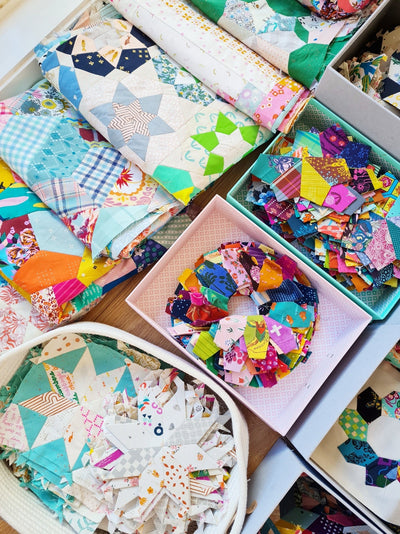
I store my EPP WIPs (works in progress) in tubs. I've tried a mix of archive boxes and clear plastic over the year, and both work well. I prefer archive boxes with labels if they're stored on a shelf and plastic tubs if they're stored in a cupboard because I don't like my sewing room feeling more busy than it needs to!
I use one tub per WIP, and I store the quilt as-is in there. That means if I've chosen fabric and only half cut it, I put the cut pieces and the fabric still to cut in the tub. If I'm cutting and basting blocks as I go, I'll store the paper pieces and finished blocks in the tub, plus any blocks I've prepared in ziplock bags. When I'm ready to work on it, I bring the whole tub to my couch, or I just grab a few ziplock bags to bring out with me. Having your EPP organised like this makes it SO much easier to make progress.
Learn more about my organisation process here.

8. Have a Few EPP Quilts on the Go
It's so easy to make progress on your EPP if you've prepped a little in advance and you've found fun little times through your week to stitch (waiting in the car during kids' sport, or at the doctor's, or zoom meetings, or long trips). But, once you've finished making all your blocks, EPP suddenly isn't all that portable anymore. It's hard to sew big rows together on the go!
Since I embraced having multiple EPP quilts on the go, I've noticed I'm much more likely to finish them. Sometimes I've been pushing to finish the blocks, and I just need a little break before I change headspace to joining shapes and layout. Sometimes the rows are just boring and I need to break it up and let myself go slow.
Having multiple EPP quilts at different stages also helps take the pressure off if your quilt goes through an ‘ugly duckling stage’. Most of mine do! If I'm feeling unsure about a quilt and just push through because it's the only thing I have to do in my sewing time, I'll just stop sewing altogether. But if I can let it rest, and move onto something else, usually when I come back to it, I have new inspiration, or it wasn't as bad as I thought.
Read more about why I recommend multiple quilt WIPs here.

9. Let Perfection Go
One of my lifelong favourite phrases is, “I'm just learning.” It reminds me that imperfection is just going to be a normal part of the process. Did the colours not look as good together as you hoped? Think about what you can learn for next time. Don't have perfect points or neat stitches yet? They'll improve over time, and by the time the quilt is finished, you won't even see them anymore. Let your EPP quilt be your gentle teacher.
Drop the idea that you need to have it all figured out before you start, or that it's only worth doing if it's done perfectly. It's a lie! You are worth the time spent learning and growing your way through a beautiful EPP quilt.

10. Sew It Your Way
It can be so easy if something isn't working for you, to assume you just don't like it, or you weren't good enough or patient enough, when really, you just hadn't nailed down the right fit for you. When I took up EPP, the recommended glue was above my budget, I didn't want to buy special thread, and I found cutting around acrylic templates awkward. But, these were all part of the accepted quilting cannon. It was only when I tried things that worked for me that I fell in love with EPP.
Try things that make sense to YOU. Maybe you'd prefer to applique your EPP blocks to background squares and machine finish it. Or, perhaps you'd like to machine quilt your EPP quilt even though you've been told it's a waste to machine quilt a hand-pieced quilt after all that effort. Don't let your quilting become just another list of rules you have to follow. With a little trial and error, and creative thinking, you can make EPP something that fits in your budget, suits your sewing time and attention span, and adds real joy to your life.
Want to learn more about EPP?
That's it for my top 10 tips for EPP! But, I've also taken a number of these topics and written blog posts about them so I could cover them in more depth. Click the button below to learn even more about EPP. Happy stitching!


I like your point of view. If I had let my mistakes defeat me I would have never gotten past that first project. Thank goodness I live for the challenges.
Great post! Positive & practical advice.
Leave a comment